连接建立完成之后就要发送数据了,发送、接收数据靠 CallServerInterceptor 完成.
流程大概分为 4 步:
写入请求头、写入请求体、读取响应头、读取响应体,由 HttpCodec 来完成这几步操作。
|
|
最后看一下整体的流程图:

连接建立完成之后就要发送数据了,发送、接收数据靠 CallServerInterceptor 完成.
流程大概分为 4 步:
写入请求头、写入请求体、读取响应头、读取响应体,由 HttpCodec 来完成这几步操作。
|
|
最后看一下整体的流程图:
BridgeInterceptor 顾名思义起到了桥梁的作用,将用户的请求转换为发往服务器的请求、将服务器的响应转换为对用户友好的响应。例如把用户设置的 contentType 值设置到请求头 Content-Type 字段中。
发往服务器的请求如果用户未设置首部,BridgeInterceptor 会为某些首部设置默认值,如 Content-Length、Host、Connection、Accept-Encoding。
如果网络请求返回的报文是 gzip 压缩的,则在解压报文体后返回给用户
CacheInterceptor 拦截器:
|
|
详细看一下获取缓存策略,代码在 CacheStrategy 类中:
|
|
ConnectInterceptor 拦截器的作用是同服务器建立连接并把连接传递给下一个拦截器。
|
|
看一下 streamAllocation.newStream -> findHealthyConnection -> findConnection 方法:
|
|
Glide缓存机制分为内存缓存和硬盘缓存。内存缓存的目的是避免重复加载图片到内存、提升加载速度;硬盘缓存的目的是避免重复从网络下载图片造成流量的浪费、同时提升加载速度
读取内存缓存的地方是在 Engine#load 方法里:
|
|
进入 loadFromMemory 方法:
|
|
内存缓存也分两级。先看 activeResources 是否存在,activeResources使用一个集合保存着图片的弱引用
|
|
如果存在的话,该图片资源EngineResource的引用次数acquired会加1。如果不存在的话则接着去内存中找:
|
|
MemoryCache 是个接口。MemoryCache有两个实现类 LruResourceCache 和 MemoryCacheAdapter(低版本适配)。重点看一下LruResourceCache类。它继承了 LruCache 类,LruCache 类里使用 LinkedHashMap 来保存最近使用的图片:
|
|
LinkedHashMap类是java自带的类,实现了LRU缓存(LRU是最近最少使用算法),可以设置一个内存的阈值,当内存超过该阈值时会移除掉最老的缓存。LinkedHashMap实现LRU算法的原理可参考 https://www.jianshu.com/p/8f4f58b4b8ab
硬盘缓存也分为两种情况,一种是缓存原始图片,一种是缓存转换后的图片。
读取原始图片缓存的代码是在 DataCacheGenerator 类的 startNext 方法里:
|
|
helper.getDiskCache()获取到DiskCache对象,DiskCache 是接口类,DiskCache默认的实现类是 DiskLruCacheWrapper,看一下它的 get 方法:
|
|
细看这一行代码:
|
|
|
|
lruEntries的类型也是LinkedHashMap,可知硬盘缓存也遵循LRU算法以避免磁盘缓存的文件过大。
一种是从内存强引用LRU读取缓存后,把对应的图片从LRU移除的同时会把该图片加入到弱引用集合中。
|
|
另一种情况是当首次加载图片的任务完成之后把该图片加入到弱引用集合中。如下:
|
|
写入LRU缓存是在 Engine 类的 onResourceReleased 方法中:
|
|
对于 onResourceReleased 方法的调用时机,分为两种情况:
一种是图片的引用计数次数变为 0 的时候会调用,具体代码位置在 EngineResource 类的 release 方法中:
|
|
另一种情况是当ResourceWeakReference弱引用的对象被 gc 回收后调用 cleanupActiveReference 方法,cleanupActiveReference 同样会调用 onResourceReleased 方法:
|
|
一处是在DecodeJob 类中,当图片数据获取完成之后,会先解码再进行编码,onDataFetcherReady -> decodeFromRetrievedData -> notifyEncodeAndRelease 中:
|
|
encode方法具体实现如下:
|
|
另一处是在SourceGenerator类中,
|
|
进入 cacheData 方法中:
|
|
bitmap 的内存管理是一个很重要的话题。glide 使用了 BitmapPool 来提升 bitmap 的复用,减少 bitmap 分配内存和回收内存的次数,从而减少 GC 的频率、应用运行更加流畅。
Android 官方提供 inBitmap 的 api 来复用 bitmap.实例如下:
|
|
BitmapPool 有两个实现类: LruBitmapPool 和 BitmapPoolAdapter 类.BitmapPoolAdapter 的实现是一个空壳子,重点看一下 LruBitmapPool 类。LruBitmapPool 提供了 put 和 get 方法来操作 bitmap。LruBitmapPool 实际上是通过 LruPoolStrategy 对象来实现存取的。LruPoolStrategy 有多个实现类,不同的系统版本会使用不同的实现类:
|
|
因为目前大多数 app 的最低系统版本在 4.4 以上了,所以 重点看一下 SizeConfigStrategy ,先看 put 方法:
|
|
GroupedLinkedMap 为 glide 自定义的数据结构,支持 LRU 算法,与 LinkedHashMap 类似。不同的是,LinkedHashMap 的 LRU 是针对的 value 值,而 GroupedLinkedMap 是针对的 key 值即图片的 size、而不是bitmap。
接下来看一下 get 方法:
|
|
findBestKey 方法实现如下:
|
|
作用与 bitmapPool 类似,也是复用数组以减少内存的分配和回收,从而减少 GC 的频率、应用运行更加流畅。
已无人维护。直接 pass 掉。
用法较复杂,不如 glide 的用法简洁。优势是能大大减少 OOM 的概率,因为图片不在放在 Java Heap 中,而是放在 Ashmem(匿名共享内存)中。适用于高性能加载大量图片的场景。sdk 大小为 500 kb.
sdk大小 440 Kb,在可以接受的范围内。适合图片加载量不大的 app 使用。从网络加载速度和加载本地缓存的速度很快。android 官方也推荐使用。
程序整体架构如图:
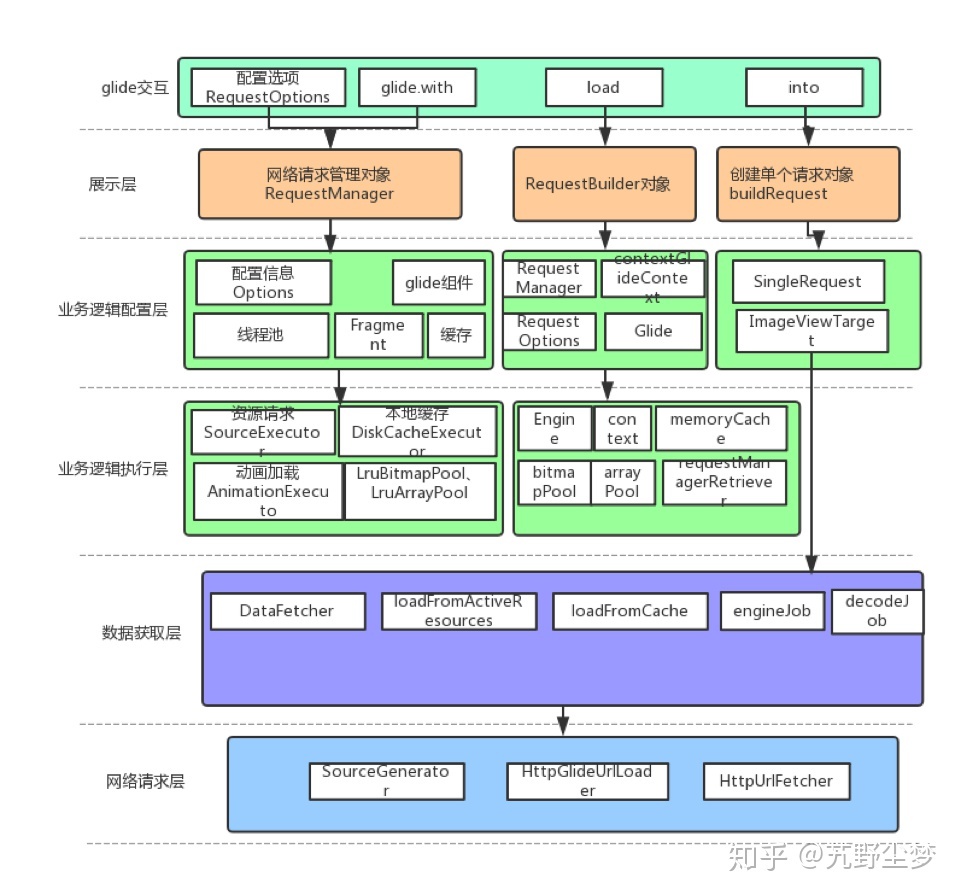
Glide为单例类。
Glide.with(this) 会创建 RequestManager ,RequestManager 是 Request 的管理类,根据activity或者fragment生命周期的变化对请求做不同的处理。具体流程如下:在参数 activity 上面创建一个隐藏的 RequestManagerFragment,该fragment用于同步activity生命周期的变化,具体方法是利用ActivityFragmentLifecycle类将生命周期的变化回调给RequestManager。
一个 activity 对应一个 FragmentManager,FragmentManager 对应一个透明的 RequestManagerFragment,RequestManagerFragment 对应一个 RequestManager。所以一个 activity 对应一个 RequestManager 实例 。
Glide.with(this).load(url)会创建RequestBuilder。RequestBuilder用来配置请求、加载图片
Glide.with(this).load(url).into(imageview):
buildRequest 方法构建请求返回 request 对象;
requestManager.track(target, request) 方法里会调用 requestTracker.runRequest(request) 方法,从而执行 request 的 begin() 方法,begin 方法里会判断请求的状态并做不同的处理。当view的大小确定以后,会执行onSizeReady方法,重点看onSizeReady里的engine.load()方法:
从 ActiveResources 里获取缓存(ActiveResources 保存弱引用的集合),生命周期短、没有大小限制;
从MemoryCache里获取缓存,使用 LRU 算法保证内存不超过限定值;
使用 engineJob 启动 decodeJob,run方法里调用 dataFetcher 的 loadData方法加载数据(从网络、本地加载),获取完成后使用 Encoder 将数据存入磁盘缓存文件中(sourceGenerator),同时使用对应的解码器将原始数据转换为相应的资源文件.
当资源加载完成时,会执行 SingleRequest类 的 onResourceReady 方法。依次跟下去会执行 target.onResourceReady 方法:
|
|
onResourceReady 方法有多种实现,以 ImageViewTarget 类的实现为例:
|
|
进入 setResourceInternal 方法,发现其调用了一个抽象方法 setResource:
|
|
setResource 方法也有多个实现。看一下 BitmapImageViewTarget 类的实现:
|
|
可以看到,上面这行代码调用 android 系统 API 把图片资源设置给 view 以完成显示工作。
EventBus源码解析
EventBus 是一个开源框架,可用于 java 和 Android 平台。由于用法简单、解耦发送者接收者、体积小等优势,EventBus 被广泛使用。大致用法如下:
第一步,定义事件类型:
public static class MessageEvent { / Additional fields if needed / }
第二步,定义接收这个事件的方法,该方法必须指定注解@Subscribe,threadMode 为可选参数:
@Subscribe(threadMode = ThreadMode.MAIN)
public void onMessageEvent(MessageEvent event) {/ Do something /};
同时,在订阅者注册和解绑订阅。对于 Android 平台的 Activity 和 Fragment 而言,注册、解绑与对象的生命周期保持一致。类似如下:
@Override
public void onStart() {
super.onStart();
EventBus.getDefault().register(this);
}
@Override
public void onStop() {
super.onStop();
EventBus.getDefault().unregister(this);
}
最后一步就是发送通知消息了,可以在代码里的任何地方发送消息,这种特性真是太方便了:
EventBus.getDefault().post(new MessageEvent());
EventBus 的用法如此简单,它到底是什么原理,下面就开始分析一下源码:
EventBus.getDefault() 使用了单例模式,返回了一个 EventBus 对象。register(subscriber) 方法实现如下:
Class<?> subscriberClass = subscriber.getClass();
List
synchronized (this) {
for (SubscriberMethod subscriberMethod : subscriberMethods) {
subscribe(subscriber, subscriberMethod); }
}
通过 subscriberMethodFinder 的 findSubscriberMethods 方法找到订阅类所对应的订阅方法集合,接着对每个订阅方法实施订阅操作。
接着看一下 findSubscriberMethods 方法的实现:
123456789101112131415161718List<SubscriberMethod> subscriberMethods = METHOD_CACHE.get(subscriberClass);if (subscriberMethods != null) { return subscriberMethods;}if (ignoreGeneratedIndex) { subscriberMethods = findUsingReflection(subscriberClass);} else { subscriberMethods = findUsingInfo(subscriberClass);}if (subscriberMethods.isEmpty()) { throw new EventBusException("Subscriber " + subscriberClass + " and its super classes have no public methods with the @Subscribe " + "annotation");} else { METHOD_CACHE.put(subscriberClass, subscriberMethods); return subscriberMethods;}
首先查询 METHOD_CACHE 看是否存在缓存,如果已经缓存该类对应的订阅方法则直接返回,避免当同一类型的对象多次注册时每次都要重新查询订阅方法。如果没有缓存则查询订阅方法。有两种方式,findUsingReflection 和 findUsingInfo 方法,通过 ignoreGeneratedIndex 变量决定使用哪种方式。该变量是指是否使用编译期的缓存信息。先看一下 findUsingReflection 方法:
|
|
findUsingReflection 方法使用 java 的反射技术获取到订阅者所有的 注解@Subscribe 方法.
findUsingInfo 方法使用 Eventbus 3.0 新引入的方法,后面再进行分析。
接着看一下 subscribe 方法:
|
|
订阅方法会把订阅信息放到全局变量集合 subscriptionsByEventType 里,subscriptionsByEventType 是每个事件类型对应的订阅信息,key 是事件类型,value 是该类型对应的订阅信息集合。后面在发送消息的会用到这个变量。typesBySubscriber 也是个全局变量,key 是订阅者,value 是订阅类型集合,后面解绑消息的时候会用到这个集合。
接着看下发信息的过程: EventBus.getDefault().post(new MessageEvent());
post(Object event)-> postSingleEvent(eventQueue.remove(0), postingState)-> postSingleEventForEventType(event, postingState, clazz),post 方法调用链条如上,看一下最重要的 postSingleEventForEventType 方法:1234567891011121314151617181920 private boolean postSingleEventForEventType(Object event, PostingThreadState postingState, Class<?> eventClass) { CopyOnWriteArrayList<Subscription> subscriptions; synchronized (this) { subscriptions = subscriptionsByEventType.get(eventClass); } if (subscriptions != null && !subscriptions.isEmpty()) { for (Subscription subscription : subscriptions) { postingState.event = event; postingState.subscription = subscription; boolean aborted = false; try { postToSubscription(subscription, event, postingState.isMainThread); aborted = postingState.canceled; } ... } return true; } return false;}
这里用到了上文中提到的全局变量 subscriptionsByEventType。此处根据事件类型找到该类型所对应的订阅信息集合,对集合里的每个订阅信息进行处理 postToSubscription(subscription, event, postingState.isMainThread):
|
|
此处理方法根据注解参数 threadMode 的值在指定的线程执行操作。通过调用 invokeSubscriber 方法来通知消息。invokeSubscriber 的实现是通过 java 的反射技术,代码如下:
|
|
至此整个流程大概走完了一遍。
EventBus 3.0 新增了注解处理器,此特性的优势是在编译期处理注解,缓存订阅信息,这样就不必在运行时通过反射获取订阅信息,减少了性能损耗、程序运行更快,据框架作者测试,注册时间快了 30-40%。注解处理器的具体实现是使用 java 的 apt 技术,apt 是 javac 的一个工具,在编译期可处理注解并根据注解信息生成新的 java 文件。
AsyncTask 是很熟悉的一个工具类了,可以使用它来执行耗时操作(比如下载文件)。用法如下:
|
|
下面从源码的角度来分析一下整个流程:
|
|
从代码中可以看到,构造方法创建了两个对象。第一个匿名类对象里的回调方法 call() 里调用了 doInBackground 方法。第二个匿名类对象的回调方法 done() 方法里调用了 postResultIfNotInvoked(get()) 方法。
接下来看一下 AsyncTask 的 execute() 源码:
|
|
只有一行代码。继续跟踪下去:
|
|
onPreExecute() 方法得到了执行(在主线程中)。接着执行 exec.execute(mFuture) ,实际上是执行 SerialExecutor 的 execute() 方法。
|
|
SerialExecutor 的 execute() 方法传参是 mFuture 对象,所以会执行 mFuture 对象的 run() 方法。FutureTask 的 run() 方法源码如下:
|
|
中间有一句代码 : result = c.call(); 该行代码是在子线程中执行的,c.call() 方法即为刚才第一个匿名类对象里的回调方法 call() 方法,这句意味着 doInBackground() 方法子线程中被调用了。
随后会执行 ran = true;
if (ran)
set(result);
跟踪下去会执行 finishCompletion 方法:
|
|
注意倒数第二行的 done(); 方法,它就是刚才第二个匿名类对象mFuture 的回调方法 done() 方法 也就是说postResultIfNotInvoked(get()) 方法就得到了执行。 postResultIfNotInvoked 方法调用了 postResult 方法:
|
|
这就涉及了 handler 异步消息处理。主线程中的 handler 方法会处理此消息:
|
|
MESSAGE_POST_RESULT 的消息到来时会执行 result.mTask.finish(result.mData[0]); finish 方法源码如下:
|
|
onPostExecute(result); 代表 AsyncTask 的方法 onPostExecute 得到了执行(主线程中执行)
按照张邵文老师在极客专栏的建议,熟悉一下 c 代码的崩溃和分析流程。
breakPad 是谷歌开源的工具,可用来采集和分析 c 代码的崩溃信息。
整体流程不复杂,可分为以下几步:
1.导入邵文老师在 github 的 sample 工程(建议保证环境能够科学上网,要下载不少东西),在手机上运行点击崩溃按钮,手机 sdcard 上新增了崩溃日志。
2.接下来就要使用 minidump_stackwalker 工具来解析崩溃日志了。自己在这一步卡了很长时间:
邵文老师提供的 minidump_stackwalker 工具是在 mac 环境编译出的,我这里是 Ubuntu 环境,不能直接使用,需要自己重新编译出 minidump_stackwalker 工具。一开始时按照 https://github.com/google/breakpad 的方法尝试编译,下载 depot_tools 工具后,fetch breakpad 老是失败,上网搜了不少方法,还是没有解决 fetch breakpad 失败的问题。后来自己想了想,fetch breakpad 实际上就是拉取 breakpad 的源码,既然通过 depot_tools 工具下载失败,直接从 github 上把 breakpad 源码 clone 下来不就好了。从 github 上 clone 下源码后,进入源码目录 cd src 然后 ./configure && make,这时会报错缺少文件third_party/lss/linux_syscall_support.h , 需要在源码根目录下创建 third_party/lss,然后去 https://chromium.googlesource.com/linux-syscall-support/+/refs/heads/master 下载 linux-syscall-support-refs_heads_master.tar.gz 并解压文件到 third_party/lss 目录下,此时再 ./configure && make 即可成功编译。编译成功后在源码根目录下进入 /src/processor目录就能发现 minidump_stackwalker 工具已经生成出来了。
3.使用 minidump_stackwalk crashDump/*.dmp >crashLog.txt 生成堆栈跟踪log。打开文件
后可看到:
|
|
由日志可以看出崩溃原因时原因为 libcrash-lib.so 的代码里出现空指针了,此时记录下地址 0X600
4.符号解析,可以使用 ndk 中提供的addr2line来根据地址进行一个符号反解的过程.
|
|
数组的每个索引做为一个阶梯,第 i个阶梯对应着一个非负数的体力花费值 cost[i] ,索引从0开始。
每当你爬上一个阶梯你都要花费对应的体力花费值,然后你可以选择继续爬一个阶梯或者爬两个阶梯。
您需要找到达到楼层顶部的最低花费。在开始时,你可以选择从索引为 0 或 1 的元素作为初始阶梯。
示例 2:
输入: cost = [1, 100, 1, 1, 1, 100, 1, 1, 100, 1]
输出: 6
解释: 最低花费方式是从cost[0]开始,逐个经过那些1,跳过cost[3],一共花费6。
动态规划的解题思路可以从一下考虑:回溯算法实现 - 定义状态 - 画递归树 - 找重复子问题 - 画状态转移表 - 根据递推关系填表 - 将填表过程翻译成代码。
回溯算法大概是把所有可能的路径都走一遍,然后从中选择一条花费最小的路径。这里就不写代码了。
最后贴一下代码:
class Solution {
public int minCostClimbingStairs(int[] cost) {
    if(cost == null || cost.length == 0 || cost.length == 1)
    {
        return 0;
    }
    int[][] status = new int[cost.length][2];
    //初始化第一行数据
    status[0][0] = 0;
    status[0][1] = cost[0];

    for(int i = 1;i<cost.length;i++)
    {
        // statas[i][0] 表示不经过第i个阶梯,未经过第i个阶梯的一定经过第i-1个阶梯
        status[i][0] = status[i-1][1];
        //statas[i][0] 表示经过第i个阶梯,经过第i个阶梯不一定经过第i-1个阶梯
        status[i][1] = cost[i] +Math.min(status[i-1][1],status[i-1][0]);
    }
    return Math.min(status[cost.length-1][0],status[cost.length-1][1]);
  }
}
handler 使用方法大致如下:
HandlerThread handlerThread = new HandlerThread("HandlerThread");
handlerThread.start();
Handler mHandler = new Handler(handlerThread.getLooper()){
    @Override
    public void handleMessage(Message msg) {
        super.handleMessage(msg);
        Log.d("HandlerThreadActivity.class","uiThread2------"+Thread.currentThread());//子线程
    }
};
Log.d("HandlerThreadActivity.class","uiThread1------"+Thread.currentThread());//主线程
Message msg = new Message();
mHandler.sendMessage(msg);
总的来说,就是 Looper 不断地从 MessageQueue 里拿出 Message 执行。而 Message 是通过 Handler 插入 MessageQueue 的.
从源码的角度分析一下整个流程:
Looper.prepare()和
Looper.loop(); 下面会分析这两个方法
此方法代码如下:
if (sThreadLocal.get() != null) {
throw new RuntimeException("Only one Looper may be created per thread");
}
sThreadLocal.set(new Looper(quitAllowed));
该方法是在当前线程创建一个 looper 对象并存储此对象在当前线程中。
mQueue = mLooper.mQueue;
由上面代码可以看出,创建 handler 对象的时候会把 looper 对象中的 mQueue 赋值给 handler 对象中的 mQueue。
此方法实际是调用 enqueueMessage(MessageQueue queue, Message msg, long uptimeMillis)
方法。
msg.target = this; // 把当前 handler 对象保存到 msg.target
if (mAsynchronous) {
    msg.setAsynchronous(true);
}
return queue.enqueueMessage(msg, uptimeMillis);
queue.enqueueMessage(msg, uptimeMillis) 会把 message 对象给放到 mQueue 中
(mQueue 内部是使用单链表的形式存储 message 队列的。)
此方法代码如下:
final Looper me = myLooper();
final MessageQueue queue = me.mQueue;
...
for (;;) {
     Message msg = queue.next(); // might block
     if (msg == null) {
         // No message indicates that the message queue is quitting.
         return;
     }
     try {
         msg.target.dispatchMessage(msg);
         end = (slowDispatchThresholdMs == 0) ? 0 : SystemClock.uptimeMillis();
     } finally {
         if (traceTag != 0) {
             Trace.traceEnd(traceTag);
         }
     }
    ...
     msg.recycleUnchecked();
 }
looper() 方法中有个死循环 for 方法,一直在取消息队列中 queue 中的消息, 然后对每个 msg
调用 msg.target.dispatchMessage(msg)。如刚才所写,msg.target 实际就是 handler 对象,
即调用 handler.dispatchMessage 方法,dispatchMessage 方法会调用 handleMessage(Message msg)
方法,这时就可以对消息进行处理了。消息处理机制大致如此。
有人说在线程中创建 Handler 的实例时需要传入 Looper 实例。我想了想自己之前在 UI 线程使用
Handler 时 Handler 的构造函数传参是空的,也能正常使用 Handler。猜测 android 系统默认就在 UI 线程创建好了 Looper 实例。于是就去源码当中寻找答案。
android 启动 app 的入口 ActivityThread 的 main 方法调用了 Looper.prepareMainLooper()
方法。下面是 Looper.prepareMainLooper() 的实现:
public static void prepareMainLooper() {
   prepare(false);
   synchronized (Looper.class) {
       if (sMainLooper != null) {
           throw new IllegalStateException("The main Looper has already been prepared.");
       }
       sMainLooper = myLooper();
   }
}
此方法是在主线程创建了 Looper 的实例 sMainLooper,所以说主线中Handler 的构造函数传参为空也是能正常使用。